


J3030 Audio Spectrum Analyzer
৳ 22,500
| Specification | Detail |
|---|---|
| Model | JC3030 |
| Voltage | AC 100–240V |
| Max Current | 0.2A |
| Frequency Response | 20Hz – 20kHz |
| Sensitivity | > -40dB (94dB SPL @1kHz) |
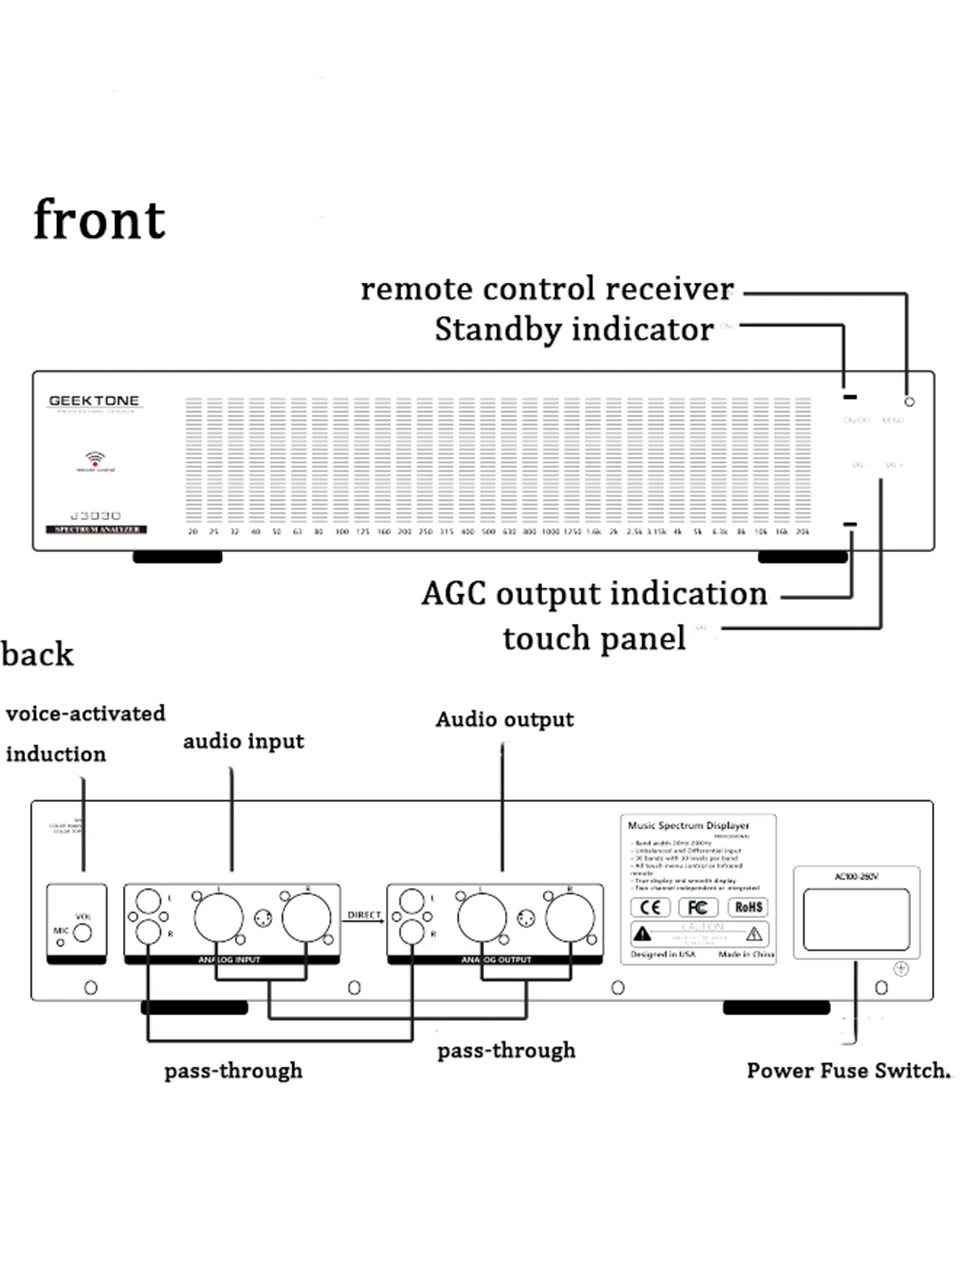
| Input Types | RCA, XLR, Built-in Microphone |
| Control Options | Touchscreen & Remote Control |
| Display Modes | 14 visualizations |
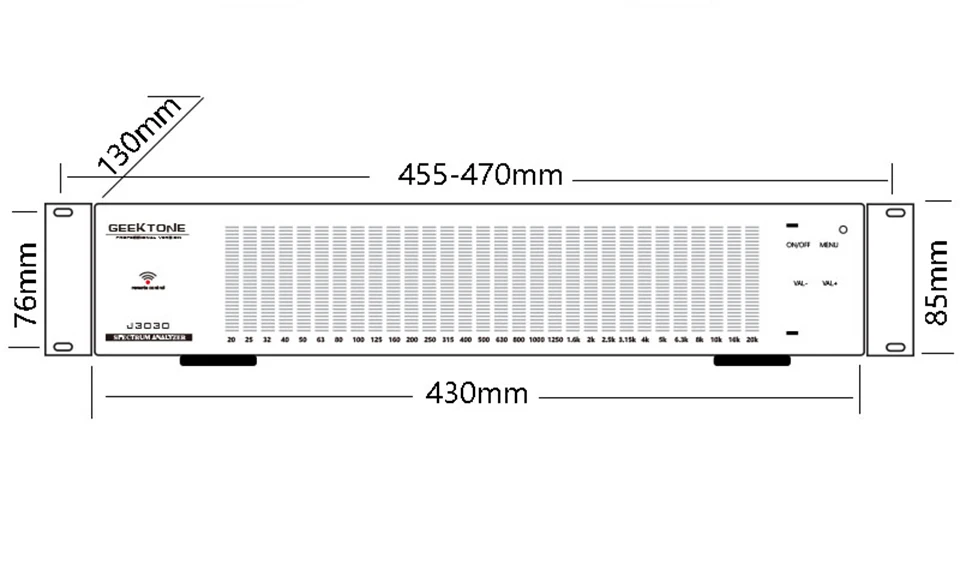
| Product Dimensions | 430 × 88 × 135 mm |
| Weight | 2.5 kg |
JC3030 – Visual Spectrum Audio Analyzer (Professional Edition)
Bring Your Music to Life with Light
The JC3030 is a high-performance visual spectrum audio analyzer designed for music lovers, home theater enthusiasts, streamers, and studio setups. With elegant design and powerful audio visualization, it transforms sound into captivating visuals using real-time spectrum analysis based on a Fourier algorithm. Whether you’re fine-tuning your studio, enhancing your gaming setup, or creating the perfect ambiance in your living room, the JC3030 makes music visible.
Designed with simplicity in mind, it supports RCA and XLR input/output and can be used with audio sources like amplifiers, smartphones, PCs, or DACs. Though not intended as a lab-grade tool, this analyzer is a must-have for any audiophile wanting to enjoy the rhythm of music in a new, immersive way.
🔹 Key Features
-
Fourier-based Spectrum Display
Advanced DSP using an ARM Cortex-M4 processor provides precise real-time frequency visualization. -
Multiple Input Options
Supports both RCA and XLR line inputs, or use the built-in microphone for ambient audio pickup. -
Dynamic Display Modes (14 Total)
Choose from spectrum bars, peak points, waterfall charts, waveform displays, stereo level meters, and more – all adjustable via touch screen or remote. -
Personalized Tuning Options
Customize your experience with brightness, speed, gain, smoothing, and noise cancellation settings. -
Intelligent Features
Includes AGC (Automatic Gain Control), auto sleep, real-time clock display, and demo mode. -
Versatile Applications
Ideal for home audio setups, studios, gaming rooms, music cafes, and content creation spaces.
Instructions & Operation Guide
🔌 Power On
-
Plug in the AC power cord.
-
Flip the power switch to turn the unit on.
🔌 Power Off / Standby
-
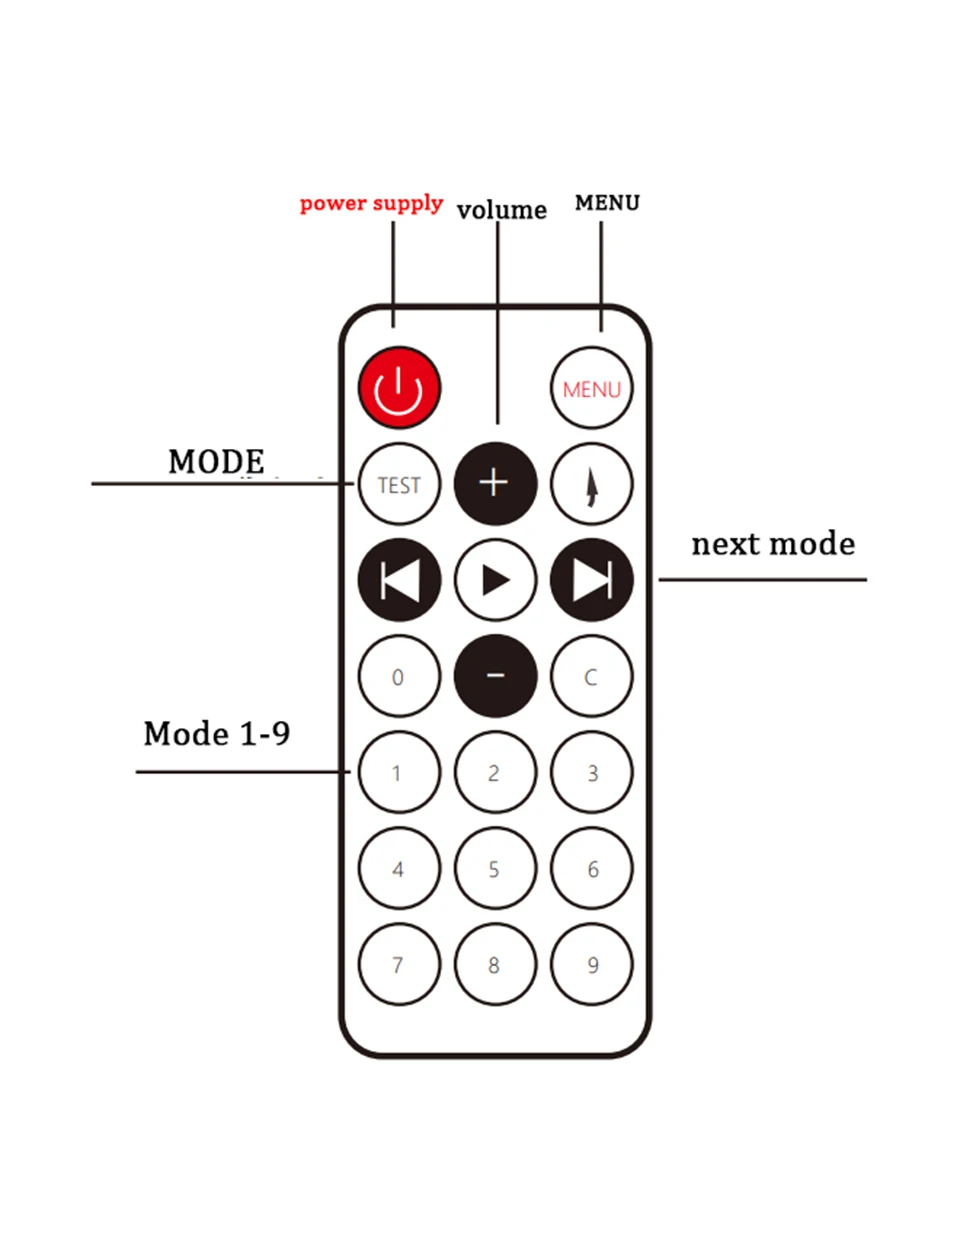
Use the power button on the remote control to switch between standby and active modes.
-
After approximately 6 seconds of silence, the device automatically enters clock display mode.
-
It will automatically activate again when sound is detected.
⚙️ Parameter Tuning
-
Tap the Menu button on the device or remote control to enter the settings menu.
-
Use the VOL+ / VOL- buttons to adjust menu options.
-
To exit the menu, press the remote’s Exit button or wait 5 seconds for the menu to disappear automatically.
🎚️ Sensitivity Adjustment
-
During normal operation, press VOL+ / VOL- to adjust sensitivity.
Range: 0–19 -
An adjustable potentiometer on the back of the unit allows line gain adjustment (only effective for line input).
⏰ Clock Adjustment
-
Enter Clock Display Mode (MODE: 9).
-
Use the VOL- button to select position, and VOL+ to change values.
📊 Display Mode Descriptions (MODE Setting)
Select from 14 display modes using the remote or touch interface:
| Mode | Description |
|---|---|
| 0 | Standard spectrum display – stereo mix. |
| 1 | Mode 0 with added peak-hold points and delayed fall-off. |
| 2 | Split-screen display – two channels shown independently. |
| 3 | Mode 2 with peak-hold and delay, similar to Mode 1. |
| 4 | Like Mode 2, with a center horizontal baseline. |
| 5 | Like Mode 3, with a center horizontal baseline. |
| 6 | Peak-hold display only. |
| 7 | Waterfall spectrum – frequency (x-axis) over time (y-axis). |
| 8 | Stereo waveform – time vs. amplitude. |
| 9 | Waveform with bottom baseline. |
| 10 | Dual waveform display – left/right channels shown separately. |
| 11 | Horizontal level meter expanding from center. |
| 12 | Mode 11 with peak points added. |
| 13 | Clock display with dual level meters at the bottom. |
⚙️ Additional Settings
-
SPEED: Controls fall speed of floating points and horizontal scroll.
Range: 0–4 (slow to fast) -
DIMMER: Screen brightness adjustment.
Levels: 0–4 -
GAIN: Manual gain control.
Range: 0–19 -
SMOOTH: Visual smoothing settings.
0 = None, 1 = Linear smoothing, 2 = Quadratic fitting -
LEARN (Noise Cancellation):
Press VOL+ to enter learning mode.
A horizontal line appears — ambient noise during this time will be sampled and filtered out in future displays.
After ~30 seconds, the process ends, normal display resumes, and gain resets to 0. -
DEMO: Automatic demo mode.
0 = Off, 1 = On (cycles through display modes automatically) -
MIC: Enable or disable built-in microphone input.
0 = Off, 1 = On -
AGC (Automatic Gain Control):
0 = Off, 1 = On
AGC adjusts input gain dynamically every 5 seconds to maintain ideal display amplitude. -
SLEEP: Automatic sleep mode.
0 = Off, 1 = Switches to clock display after mute -
FACTORY: Resets all parameters and noise data to factory defaults.
Be the first to review “J3030 Audio Spectrum Analyzer”
Related products
The most prominent product in the store, which was bought with the highest number - related

-
- Quick View
-
৳ 20,000Read more
Sunbuck EQ8000
Sunbuck EQ8000
Sunbuck EQ8000
Sunbuck EQ8000System Parameter :
POWER: 220V~240V/50Hz
Frequency Response: 20Hz to 20KHz[+/-10d8)
Input Sensitivity: 150mV
Tone Control:TREBLE:10dB at 10KHz
MID: 8d8 at 1KHz BASS: 10d8 at 100Hz
Surround Effect Control: 0-10d8
Signat to Noise Ratio: >71dB
Loudness: +6d8 at 100Hz.+6d8 at 10KHz
Product features:
STEREO 20-BAND GRAPHIC EQUALIZR
Professional Hiah-Power Electrical Source
Full Function Protect System
Low Noise And Low Distortion
Karaoke igital Echo Effect
31 segments of dynamic spectrum (12 modes)
Bluetooth V5.4
(Note: Without FM radio function.)

Reviews
There are no reviews yet.